TIFF2DROPLET
During the development and testing of the Edge Rasterizer, we built tools to help visualize the droplet coverage and compare it to the input data. The Edge rasterizer produces a set of Gerber outputs that are designed specifically for that purpose.
We also needed to compare the results of the Edge Rasterizer against other rasterizers. This was not easy to do so we built the program called TIFF2DROPLET to make such comparisons possible.

Flow for comparing the results of two rasterizers
While comparing the results of two different rasterizers might seem simple it turns out there are quite a few things that make it quite difficult:
not all rasterizers produce 100% pixel coverage. For example, the Edge Rasterizer was designed specifically to space droplets much farther apart than the pixel grid.
the outputs of the two rasterizers may not cover the exact same area.
the bitmap output of the two rasterizers may not be at the same DPI. Let's say you want to compare coverage at 1200 DPI vs. 2400 DPI. You can't do that with two separate bitmaps but you can do that using TIFF2DROPLET.
one needs to view the actual diameter of the droplet. The bitmaps don't show this.
one needs to view the bitmap superimposed over the source data in order to see where there are errors. Since TIFF2DROPLET replaces each droplet pixel with a round flash, you can overlay this data onto the original data and cleary see how the droplets cover the original traces, flashes and areas.
How TIFF2DROPLET Works
InputA TIFF or BMP file. Must be monochrome. Since the droplet data is much larger than a bitmap we don't recommend that you attempt to process giant bitmaps. We didn't design the converter to handle 20K x 20K bitmaps.
Parameters
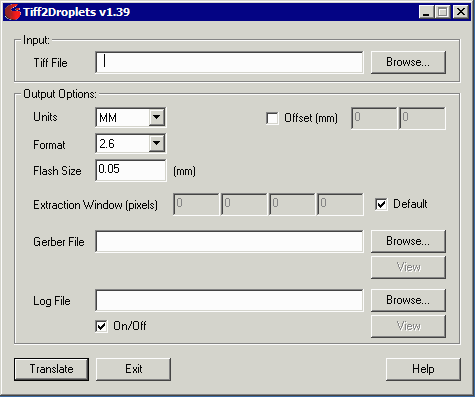
Gerber Format and Units - match this to your the units and format of the Gerber file you wish to superimpose the droplet data over. Make sure you have plenty of resolution in your format so that you don't introduce errors due to a low precision format that aren't there.
Flash Size - this is the "diameter" of the droplet. Each "black" pixel in the bitmap will produce this flash.
Offset - this is an offset you will have to enter in order to overlay the droplet Gerber file with the input Gerber file. This value normally must be determined by some trial and error unless your Gerber viewer can accept an offset for each layer that it loads. This is a vector value added to the Gerber output.
Extraction Window - If you have a very large bitmap you can still convert a smaller portion of it to droplets. Use the extraction window to define the two corners (LL and UR). This values are in pixels. If Default is checked, then the extents of the bitmap define the window.
Gerber File Name - this is the Gerber file that will contain the flashes that emulate each ink droplet.
Log File - an ascii file that reports the results of the conversion. Use the check box to enable or disable the creation of the log file.
Output
Gerber "Droplet" File - this is an RS247X Gerber file consisting solely of a custom flash. The custom flash is a conventional round flash with a small cross centered. The cross is used so that one can easily "see" the center. This is useful when using a grid file for reference.
The Main Dialog

The main dialog for the TIFF2DROPLET program.
