Drawing Design Rules for DXF to GDSII

Steve DiBartolomeo
Applications Manager
Artwork Conversion Software, Inc.

ASM 3500 converts AutoCAD DXF files into GDSII so that AutoCAD users can send their drawing files to IC design software or to mask making machines. The two databases are not organized alike. Therefore, not every entity in AutoCAD has a corresponding element in GDSII.

Since the GDSII file is usually processed one more time to create mask data, there may be additional limitations imposed on what you may draw by the mask making machine. This document summarizes good drawing practices.

Contents

Setting up the AutoCAD Drawing Environment

Since your intention is to transfer information accurately to GDSII you should set up your AutoCAD drawing environment as closely as possible to the equivalent drawing environment for GDSII systems. The following parameters should be set.

Grid

GDSII is an integer database; AutoCAD uses a double precision database that is not really grid based. To get a GDSII database that exactly corresponds to the AutoCAD drawing, you should set a grid in AutoCAD and then use that grid for snap purposes. A typical grid value if you were drawing a semiconductor would be 0.5, 0.1, 0.25, 0.01 or even 0.001 for units of microns.

Snap
Turn grid snap ON if at all possible. This will insure that each point entered in AutoCAD can be exactly mapped to GDSII. Failure to do this may result in the GDSII data snapping to the nearest grid point and possibly corrupting your intent.

Units
AutoCAD is dimensionless. AutoCAD's UNITS command affects only the display and does not set drawing units. You should work in the units that the final GDSII system will use if possible. Common GDSII units are in microns for most semiconductor applications. For example, if you are designing a mask for a microsensor you should draw in units of microns - i.e., a line of width 5 represents 5 um wide.

UCS and VPOINT
Make sure that you set UCS (user coordinate system) to WORLD and that you do not modify the Vpoint. AutoCAD modifies the coordinates of entities entered while a different UCS is in effect. The translator will not map these to the GDSII database correctly.

Layer Names
GDSII uses layer numbers from 0-63. We suggest that you do the same with your AutoCAD layer naming scheme so that there is less chance for confusion. dxf2gds and gds2dxf translators do include a method of controlling AutoCAD name to GDSII layer number mapping if needed. However you are free to use descriptive names such as POLY, M1 and DIFF as long as you know which GDSII layer number you will map these names to.

No Hatching
Some designers think that they should use AutoCAD's hatching command to indicate filled areas on the mask. If you feel the need to hatch, you can do so but realize that the hatch entity will be ignored by the ASM 3500 translator.


Data Origin

In the semiconductor business, GDSII data is often centered around 0,0 [figure B]. Check with the receipient of your data. If you don't know this would be the default. It is also OK to locate 0,0 near the lower left of your data extents [figure A]. However it is bad practice to locate your data "far" away from the origin. [Figure C].

origin.gif


Drawing Boundaries

One of the two basic entities in GDSII is the boundary.

Closed

A boundary consists of a series of straight segments forming a closed area. The first and last vertex must be the same. The inside of the boundary is solid.

Number of Vertices

A boundary may have no less than 3 vertices and no more than 200 vertices. The upper limit of 200 is generally not a factor anymore as most tools that read and write GDSII can support many more vertices -- 1024 or 2048 or 4086. The absolute maximum based on the nature of the GDSII boundary record is 8192-1.

No Self Intersection

A boundary may not overlap on itself nor self-intersect. However it may touch itself. A boundary that touches itself is called a re-entrant boundary. (See d) and e)

boundary

Drawing Boundaries in AutoCAD

There are several different ways to draw a closed boundary in AutoCAD.

Zero Width Closed Polyline (zwcp)

The best way to draw boundaries is to use AutoCAD's zero width polyline and to use the close command to close the polyline.

Polylines with Width

You can also use an AutoCAD polyline with width. If you want to get a PATH entity in GDSII you must use a constant (non-zero) width for your polyline.

vertex to vertex with the following exceptions:

[a] do not start or end with a zero width vertex
[b] do not use an arc section that changes width
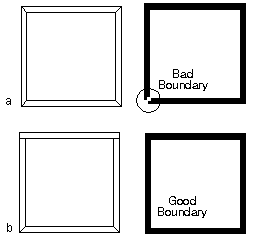
[c] do not close a polyline with width

dr_f3.gif

A closed polyline with width will result in either a self intersecting boundary or path [a]. Many times a user will want to draw a frame around an area using a wide polyline. Do this with two separate polylines.

Solids
The AutoCAD solid entity may be used as long as you do not accidentally draw a bow-tie solid. However we don't recommend using this AutoCAD entity unless you absolutely must do so.

Lines and Arcs
Lines and arcs may be used to form closed boundaries, but the designer must take great care to make sure that the endpoints snap together and that there are no hidden lines under lines. An Autolisp program called BBPRO is available from Artwork that will interactively convert lines and arcs into zero width closed polylines. Or one can use the BPOLY command in most cases and then delete the lines and arcs used to define the BPOLY.

It is also possible to accidentally draw self-intersecting boundaries when using lines and arcs since the linking routine may come to a point where the correct path to follow is ambiguous.


Re-entrant Boundary

While a GDSII boundary may not self intersect, it may touch itself. This is called a re-entrant polygon.

rentrant.gif

Re-entrant polygons should only be used if one is sure the subsequent GDSII reader can support them. Re-entrant boundaries should only be drawn using zero width closed polylines.

200 vertex limit

The 200 vertex limit is an artificial one imposed by the GDSII definitions. Many software developers have found this limitation too restrictive and have developed programs that support more than 200 vertices.

For example, if you are generating GDSII data to be sent to a MEBEs fracturing software, such as CATS by Transcription Enterprises, you may find that this fracturing software supports boundaries with vertices up to 2048 sides.

If you verify that the end user can accept more than 200 vertices, then you can go ahead and

    1] draw more complicated boundaries and
    2] configure Artwork's translators to support more than 200 vertices.


Drawing Paths using Polylines

In addition to the boundary, GDSII also has a PATH entity. (Some CAD systems call a path a WIRE). These are often used in IC's to interconnect boundaries representing metal pads.

path.gif

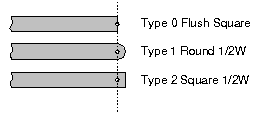
There are three types of PATHS:

ptype.gif

ASM 3500 always generates PATHS of type 0.


Characteristics of PATHS

  • The GSDII path has constant width.
  • It must have at least two vertices and no more than 200 vertices
  • If a path bends through more than 90 degrees the corners may be mitered - however there is no GDSII specification on the mitering rules.

Drawing PATHS in AutoCAD
Always use the AutoCAD polyline with width. Width should be constant. You can force a polyline to have a constant width by using the PEDIT command and setting the width.

Path Mitering
AutoCAD does not miter polylines that bend through more than 90 degrees but many CAD systems that import GDSII data automatically apply some type of mitering. This is not under control of the translation software.


Drawing Islands and Isolated Areas

Islands are clear field areas surrounded by a dark field on the mask. They cannot be drawn in the same manner as you would for controlling a plotter or cutting machine. AutoCAD and GDSII have no way to determine that a particular polygon interior should be clear.

In the drawing to the right, the designer drew one boundary inside of another [a].
Instead of getting the mask he desired [b], he got the black mask shown in [c].

This is because GDSII fills each boundary solid independent of its relationship to other boundaries. There is no such thing as an empty boundary in GDSII.

island1.gif
There are a couple of ways to work around this:

Two mating boundaries

You can use two separate boundaries that butt up against each other to form the frame. Only use a closed polyline - if you use lines, most likely they will be linked incorrectly to form a self intersecting boundary.

island2.gif

These actually touch but are shown separated for clarity.

Re-entrant Boundary

Another method to realize an island is to go into the interior of your polygon and out again via the same path. This is called a re-entrant boundary. This is best done using a closed zero width polyline.

island3.gif


Text

ASM 3500 supports text but cannot pass the actual font information. Therefore, you should not rely on fancy or special text fonts. The simple txt.shx font is fine.

Supported Text Functions:

  • Rotation
  • Mirroring
  • Height
  • Justification
  • Upper Case Numbers and Characters and period, comma, dash, space and slash 1234567890 ABCDEFGHIJKLMNOPQRSTUVWXYZ .,- _ /

Unsupported Text Functions

  • Obliquing
  • Vertical
  • Dynamic (i.e. fitted or where width factor not equal to 1)
  • Special Characters
  • Special Fonts

Target System Limitations

Just because ASM 3500 supports text and text is a valid entity in GDSII, it does not mean that all target systems will correctly read text. Some GDSII postprocessors do not support text. Check with the user of your target system.

If you know that your target does not support text, the dxf2gds translator offers a special option called PG Text. This option converts your strings of text into GDSII boundaries automatically so you don't have to do it.

pgtext.gif
Top: text appearance using txt.shx; Bottom: after conversion to polygons using PG font.


Using Blocks and Inserts

Blocks are very useful for repetitive data - you can nest blocks inside of blocks to minimize your drawings size.

Rules

Scale
Insert blocks at scale=1 if possible. Although GDSII and dxf2gds support blocks inserted with scale, many GDSII postprocessors such as those used to create MEBEs files do not support structures inserted at other than scale 1. Never insert a block with x scale different from y scale. GDSII does not support this.

Insertion Layer
Insert all blocks on layer 0. While this is not mandatory you should note that, unlike DXF, GDSII does not mark on which layer structures are inserted. Draw the entities in the block on any layer but 0.

Rotation
Do not insert blocks with rotation unless absolutely necessary. Many CAD systems that import GDSII only support rotations of 90, 180 and 270 degrees - some don't support rotation at all.

Block Names
It is good practice to use only upper case characters and numerals for block names. Many CAD systems that import GDSII have difficulty with lower case block names - some reset the names to upper case and some fail on importation. GDSII allows up to 32 characters maximum per name. Don't use spaces in block names even if AutoCAD allows it.

Block Attributes
Block attributes are not passed to GDSII.

MINSERT

AutoCAD's MINSERT command (multiple insertion of blocks) is translated to a GDSII AREF (array reference). This is a very useful command for inserting large arrays of cells and it keeps both the DXF and GDSII database small. We suggest that if you use this command that you:

  1. Never rotate the MINSERT
  2. Always make the row and column distance positive values

Reason
Although the translator and GDSII database support both rotation and negative step sizes we have found that many other GDSII based programs do not implement these transformations consistently. You may spend many hours chasing down weird effects at the other end.


Circles/Arcs

Avoid using circles and arcs unless necessary. Although the dxf2gds translator can convert circles and arcs into GSDII data, it is not a perfect translation because GDSII does not support an arc or circle entity. The translator will approximate your arc or circle with a series of short segments. You have some control over this approximation. If you have many circles of the same diameter you may want to convert your circle(s) into a block. This will reduce the size of the GDSII file.

The GDS.CFG keywords arcres and arcsag control how arcs and circles are fractured.

ARCRES (Arc Resolution)
Arcres is a value in degrees that determines how many segments are generated per curve. Typical values range from 2 degrees up to 15 degrees.

ARCSAG
Arcsag is the maximum error between the ideal arc and the segmented arc. This value always occurs at the center of each chord as shown in the illustration. dxf2gds will then calculate the number of segments required to produce the desired maximum error. A zero value of arcsag causes the translator to ignore the setting.

Combining Arcsag and Arc Res
The two parameters can be used together - the one that results in the more precision will take effect.


Creating the DXF File

This step may seem simple but we often see many customer errors in simply creating the DXF file from AutoCAD.

Purge the Database

ASM 3500 translates all entities and blocks in your DXF file whether or not the layer is on, off or frozen. To minimize translation time, and to reduce the ultimate GDSII file size you should clean and purge your drawing prior to running the DXFOUT command.

  1. Erase all data on layers you do not wish to translate to GDSII.

  2. Save your drawing. Open the drawing and use the Purge All command to eliminate unused layers, blocks and fonts.
  3. Repeat the preceding step over and over until no more items can be purged.

An alternative approach to purging is to use AutoCAD's WBLOCK command to create a new file containing only the entities you wish to translate to GDSII.

DXFOUT Command

Note: This section only applies to very old versions of AutoCAD that supported the DXFOUT command. Newer versions of AutoCAD simply allow the user to SaveAs DXF and there are no controls.

  • Always DXFOUT the entire file. Never select DXFOUT "entities" as the header is not included. Without the header dxf2gds will not run correctly.

  • Do not DXFOUT binary data (DXB) - the translator cannot read this format.

  • Make sure the number of significant places is enough. The default of 6 places is normally fine. However there are exceptions where 6 places may not be enough.

Example
A typical error is creating an AutoCAD drawing in units of inches with very small dimensions - say on the order of 0.000001 inch. If you accept the standard 6 places accuracy when creating the DXF file you may have errors in your GDSII data - due to the fact that AutoCAD stores the data internally to about 14 places but is only writing out 6 places to the DXF file.


Top of Document

ASM 3500 Page

AutoCAD Translators Page

Artwork Home