|
One often needs to send special commands to an HP laserprinter or
inkjet printer in order to control the paper source, paper destination,
page size or other parameters. For example, in our office we use a networked HP LaserJet 5Si. This particular laser printer has several trays:
Tray 2 - 8.5 x 11 paper for general purpose printing [default] Tray 3 - configured to hold 11 x 17 paper for larger prints/plots Envelope Feeder - for size 10 envelopes If I need to force my plots from GBRVU or GDSVU to Tray 3 then I add a Header string in my plotter configuration that directs the printer to use that tray. I also may need to tell the printer the size of the page - otherwise it may still try to direct the output to tray 2. Why Header String is Required?The printer/plotter drivers used in Artwork's GBRVU, GDSVU and GDSPLOT are not based on Microsoft's printer services. Instead we create internally the raster image based on the user defined parameters - plot type, page size, page margins etc...the actual plot data is send directly to the printer bypassing Windows' drivers. This means our software cannot take advantage of the Microsoft printer configurations such as tray destination, page rotation and the like.The user can still control such behavior by adding a setup string to the front of the print/plot file. This is normally done from the plot configuration advanced dialog box.
There is a place to put any string you want, but HP printers use what is called an Escape sequence because the first character of each command is the Escape character (027). ExampleI often want to get 11 x 17 plots from GBRVU and I must make sure that the 5Si uses Tray 3 as my paper source. Otherwise the plot comes out on Tray 2 and most of it is cut off. By examining the my HP LaserJet 5Si/5SiMX Printer User's Guide I find the correct sequences in Appendix B: (please note that where you see Esc we actually mean the Escape character (027) which is not, repeat not entered using the Esc key.)
Resetting the PrinterIt is always a good idea to issue a reset command:EscE Paper SourceThen I specify the paper source. The Escape sequence for paper source is:
Esc&l#H                    where #
                               1=Tray 2
                               2=Manual Feed Paper
                               3=Manual Feed Envelope
                               4=Tray 3
                               5=Tray 4 (if you have one)
                               6=Envelope Feeder
                               7=AutoSelect
                               8=Tray 1
Paper SizeI find that I must specify the larger paper size; otherwise the HP5Si decides that Tray 2 should be used....
Esc&l#A                    where #

                               2=Letter (8.5 x 11)
                               3=Legal (8.5 x 14)
                               6=Tabloid (11x17)
                               26=A4
                               27=A3
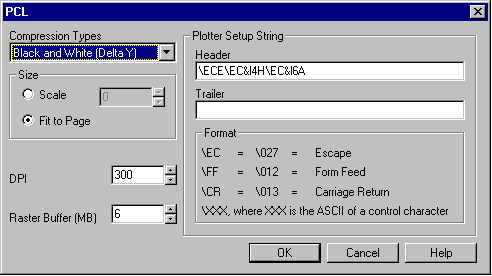
OrientationIt is not necessary to set the orientation since the Artwork plotter driver does this when you configure the orientation in the page setup dialog box. Entering the Strings Into the Plot Setup Dialog BoxAs mentioned before, you cannot type in the Esc character directly. Instead, our dialog box interprets the string \EC to be the Escape character. Therefore in the plot setup header you would type: \ECE\EC&l4H\EC&l6ASee the screen shots below:
|
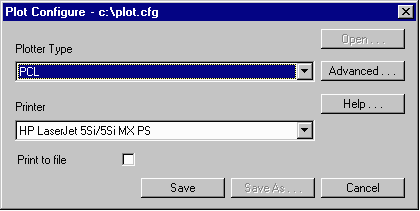
| To configure your plotter select Plot Setup. Then select PCL as the plot type and click on Advanced... |

|
|
In the box under Plot Setup String type in the required header. Note
that the Windows System font makes it very hard to distiguish lower
case L from the number 1. In the setup string shown below you are using the lower
case L. |
