
Importing the AIF over the GDSII Layout
To start our alignment we import the AIF file over our package layout inside of Qckvu3. First, open the GDSII layout and make sure that only the layer of interest is turned on. Then from the drop down menu select Plugins | Import AIF.

Open the Import AIF dialog by selecting it from the Plugins drop down.
A dialog box should open up as shown below. Select the AIF file using the Browse button. If you have already measured the pad diameter on the GDSII layout, enter the value. The click on Import

As you can see below, the AIF overlay does not line up with the GDSII layout. We'll have to transform one (the GDSII) so that they line up in order to check for any differences.

Transformations
Since our AIF layout and our package layout don't line up, we will be using Qckvu3's View | Transform Dialog to mirror, scale and move the package layout (GDSII) until it lines up correctly with the AIF layout.

Use View | Transform... menu pick to open the Transform View dialog

Translation
We can visually see there is an offset. A short inspection tells us that the center of the AIF array is located at around 0,0 and the lower left of the GDSII array of bumps is located at 0,0. So we need to shift the GDSII so that its center aligns with the AIF center.
There are a couple of different ways to determine the needed translation. But because we know that the AIF is centered at 0,0, we can use the Auto Center button (and then click Apply) to automatically center the GDSII layout. We may have to "tweak" the final translation a bit later, but for now this gets our GDSII centered at 0,0 which is the anchor point for both mirroring and scaling.
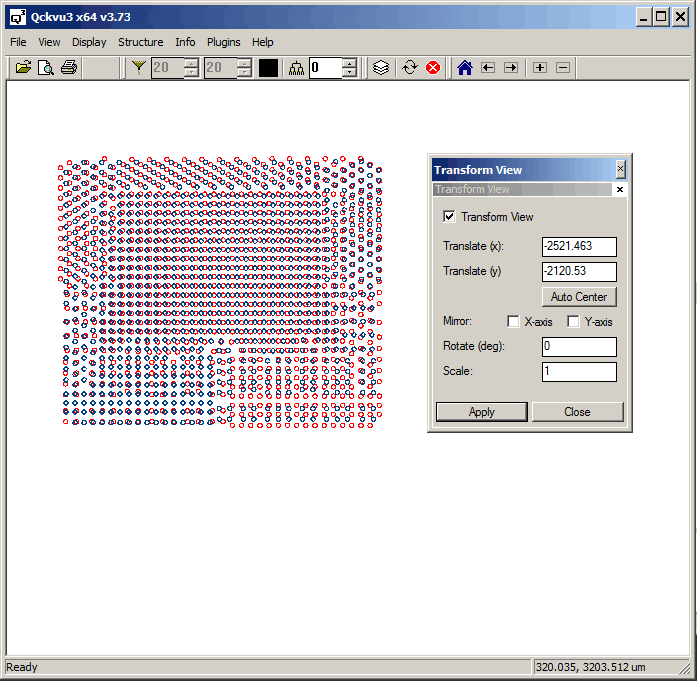
After pressing Auto Center and clicking Apply we can see that that both AIF and GDSII are now centered at 0,0.
Determining the Scale Factor
We can easily compute the scale factor by measuring the same two points on the package layout and the AIF layout. Let's measure across the bottom of each of the two layouts. First I will use both the Auto Center button and the Mirror Y-axis check box to get both layouts approximately aligned. I don't have to, but this makes it easier to make the measurements.
Next using Qckvu3's ruler, I zoom in on the bump at the far left of the bottom row and measure the distance to the bump on the far right of the bottom row. I do this for both the GDSII layout and the AIF layout. [GDSII is shown in red; AIF in blue]

Using the values returned by Qckvu3's Ruler I can then see that the GDSII distance is longer and that the GDSII distance needs to be multiplied by 0.98 to match the AIF distance. So this is my scale factor.
Mirroring
We can inspect the rows and columns of each layout and see whether or not they are mirrored. In this example, the package GDSII is mirrored along the Y axis when compared to the AIF overlay.

Matching the Bump Diamters
We would like the diamters of the GDSII bumps and the AIF bumps to match; when we get them properly aligned we can "subtract" one set of bumps from another (using the XOR Boolean operation) and if they match perfectly there will be nothing left. But there is no reason that the bump diameter in the AIF necessarily is equal to the bump diameter in the layout.
Therefore we should carefully measure the GDSII bump diameter and enter that value into the Import AIF dialog box to override the value read from the AIF File.

Using Qckvu3's ruler we determined that the pad diameter is 65 um.
Hint: When measuring the GDSII bump diameter you should already have the Transform View scaling set = 0.98 as this will have an effect on the bump measurement.
Combined Transformations
We have now measured and computed all of the needed transformations to get the GDSII to align with the AIF layout. Enter them into the Transform View dialog, press Auto Center and then click on the Apply button.

GDSII vs AIF Overlay after auto-centering, Mirror Y and scale.
As you can see we are close but still not completely aligned. Why not? Well, likely the GDSII layout's 0,0 lower left corner was not precisely positioned so that the center of the GDSII arrray ended up on 0,0. Also, the 0.98 scale factor was not taken into account when we autocentered.
However the final misalignment is easy to correct.
We can just enter some small changes into the Translate (x) box and see how our alignment changes. Just keep doing this for X hitting Apply after each change (and then repeat for Y) until you have a very tight fit.
Here are the final values arrived at:
